The Rise of Ngons
With the advent of Blender changing it’s polygon engine to include Ngons, as opposed to only supporting triangles and quadrangles (post-Blender version 2.63 circa 2012), a new mesh system known as Bmesh was introduced to Blender and brought with it several new features.
Besides the obvious advantages of creating organic and some inorganic models-types faster, Ngons also bring an addition to Blender’s sculpting toolset in the form of Dyntopo.
Ngons 101
Although Ngons are nothing new in the world of 3D, their utilization was for many years considered bad practice among many 3D professionals. This bad rap primarily stems from their unpredictable behaviour when it comes to deformation during animation. As you can imagine it is not of primary concern when ngones are utilized within a sculpt workflow, as deformation of a mesh is typically only for rudimentary purposes. There is generally no particular reason to retain transformation or deformation historical data when sculpting as this would typically be applied or baked into the mesh once sculpting resumes. Many 3D applications will simply remove this historical data by default, so as to further prevent unpredictable results.
As it became more evident that Ngons could benefit 3D sculpting more than impair it, from around the mid-2000’s it became more of a necessity for Blender’s internal mesh editing system, to be readdressed.
Building Meshes in the Early to Mid 2000’s
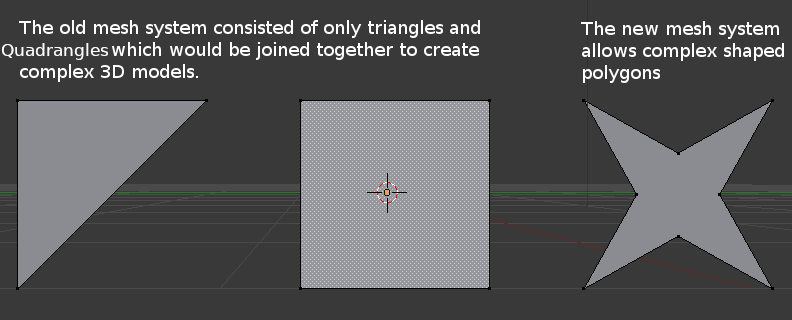
Prior to the massive uptake of 3D sculpting from as late as 2009, modelling was considered the de facto goto for building meshes. There were various options for producing outcomes matching different purposes such as box-modelling for organic surfaces, vertex pushing for real-time models or even NURBS modelling for industrial design, to name a few popular choices. However, the main consideration was that regardless of your choice in terms of modelling a mesh, that mesh would intrinsically be linked to to the final outcome (in some way or another). Therein resided the temperament of the era advocating the use of quadrangles and triangles as part of the mesh building process.


However a new implementation of 3D Sculpting was to change this fundamentally, towards the latter part of the 2000’s.
By decoupling the process of mesh building from the final outcome a new genre of 3D artist was ushered in. Unconcerned with the technicalities of modelling or the limitations of the final outcome, sculpting became truly modular and with this we saw the surfacing of many new (some old) sculpting software rising to the foreground, performing one task, primarily, that being to sculpt. 3D-Coat, Mudbox, ZBrush and of course Sculptris are some names that may come to mind. Of those perhaps, Sculptris (the only defunct sculpting software from that list) arguably accelerated sculpting into this new aforementioned era by implementing the first stable, non-commercial form of dynamic tessellation in 2009, when Sculptris reached version 1.
Although Sculptris was, shortly after reaching version 1.0, to be acquired by Pixologic (the makers of ZBrush), dynamic tessellation had already made its waves in the 3D community and we were hungry for it in our beloved Blender.
A Match Made in Heaven
In an almost synonymous and parallel timeline with Sculptris’ introduction of Dynamic tessellation to the 3D world, Blender developers were readdressing the limitations of the old mesh editing system. This system was slowly being replaced with BMesh and early adopters were able to start testing and working with the new system obtainable from GraphicAll, in 2011 (and possibly even before this, in less stable implementations).
BMesh is the underlying mesh editing system used by Blender. It is essentially a programmatic representation of the topology that comprises meshes rendered in the 3D viewports. It has its own API (Applications Programming Interface) which exposes very low-level almost C-like data structures for mesh manipulation and fortunately, if you are only concerned about making art with Blender, you’d never need to know any of that.
Prior to the inclusion of BMesh all geometry rendered in a 3D viewport in Blender could only be made up of a four-sided quadrangle or a three-sided triangle. In order to construct a complex 3D model these simple “building blocks” must then be arranged to represent the shape or form of the model. Of course, this is all relative to the degree of control you want when building your models, as much of the process of assembling the building blocks would typically be automated to some degree.
Destructive vs Non-destructive Sculpting
To clarify BMesh is not responsible for making sculpting in Blender possible, however, we certainly can attribute it for bringing to Blender a more natural and spontaneous approach to sculpting, affording artists the kind of creative freedom that alleviates many technical considerations.
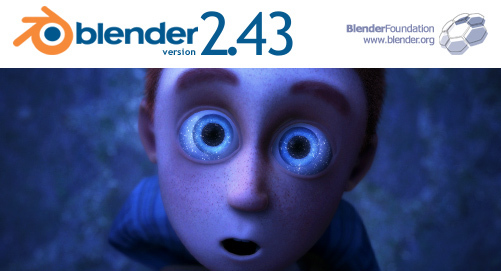
Sculpting in Blender predated BMesh by approximately half a decade having officially premiered in Blender 2.43 in early 2007. Fundamentally, the difference that BMesh brought to sculpting was in a destructive approach to realtime retopologizing, much akin to that of dynamic tessellation. This, it can be said, was to be the inspiration for what was to become Dyntopo.
Blender’s sculpting toolkit was, at the time of its inception, very much on par with that of its commercial counterparts with Maya having introduced sculpting from as early as Maya 3 which was released in early 2000. Although this timeline might lead you to think that Blender was slow to catch up, in fact, this was not the case. Sculpting just never really took off in 3D until many years later, with the advent of dynamic topology. Prior to this Blender’s modelling toolkit pioneered an impressive array of intuitive tools making it a formidable choice for any serious modeller. The point is simply, that the focus back then was not the same. It was more about creating beautiful, minimalist, topology quickly and efficiently. Arguably, Blender delivered in this respect more so than it’s proprietary counterparts.
Sure, sculpting was available but as was the case with most high-end 3D suites of the time, to fulfil the promise of being able to create highly detailed models the trade-off was typically an exceptionally high-resolution mesh. This was often the result of geometry that subdivided in areas that were just simply not necessary. One of the side-effects of non-destructive sculpting at the time.
As you would expect, the great thing about sculpting utilizing non-destructive techniques is that your model retains a history. That history is a hierarchy of the deformations applied to the model by sculpting the low-resolution model which in turn contributes to the outcomes of the medium resolution model, contributing to the outcomes of the higher resolutions and so forth. There certainly are still many benefits regarding this approach to sculpting, if you are not already familiar with them you can read more about it here.
Nonetheless, it was with the advent of Dyntopo that an insurgence in a new breed of 3D artist was born.
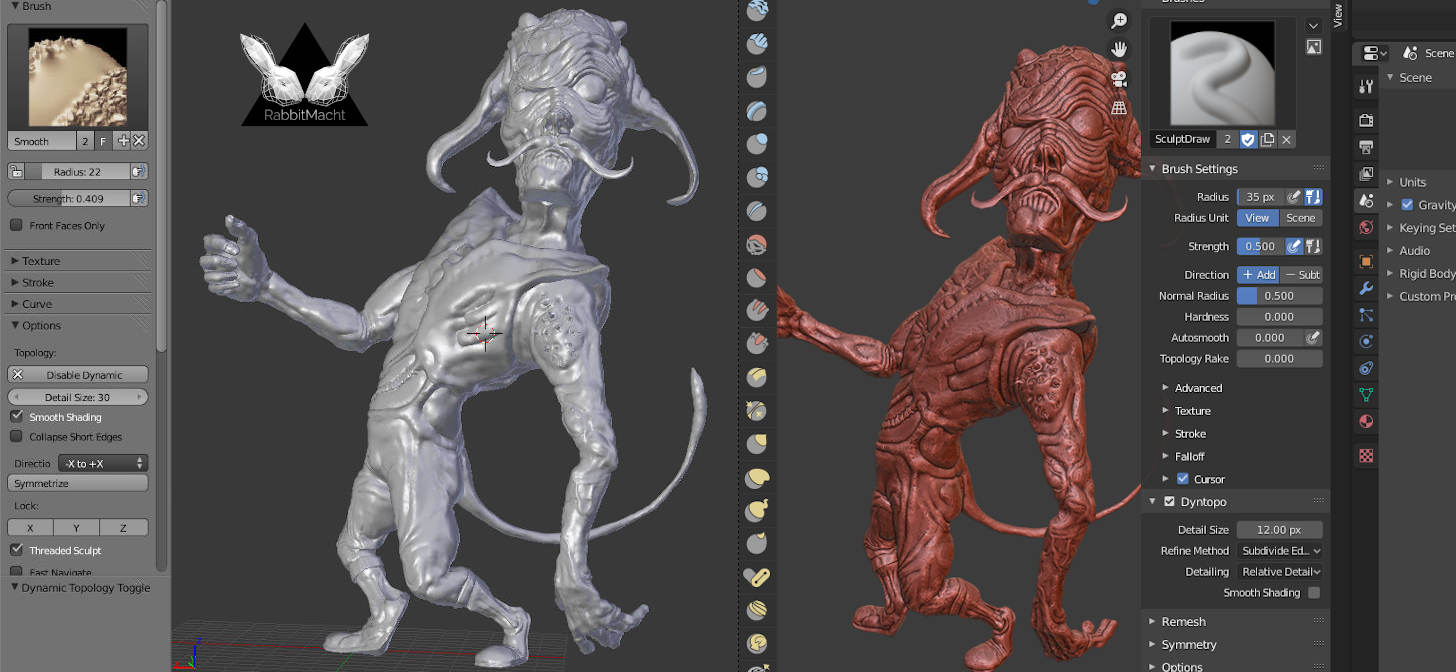
Enter Dyntopo
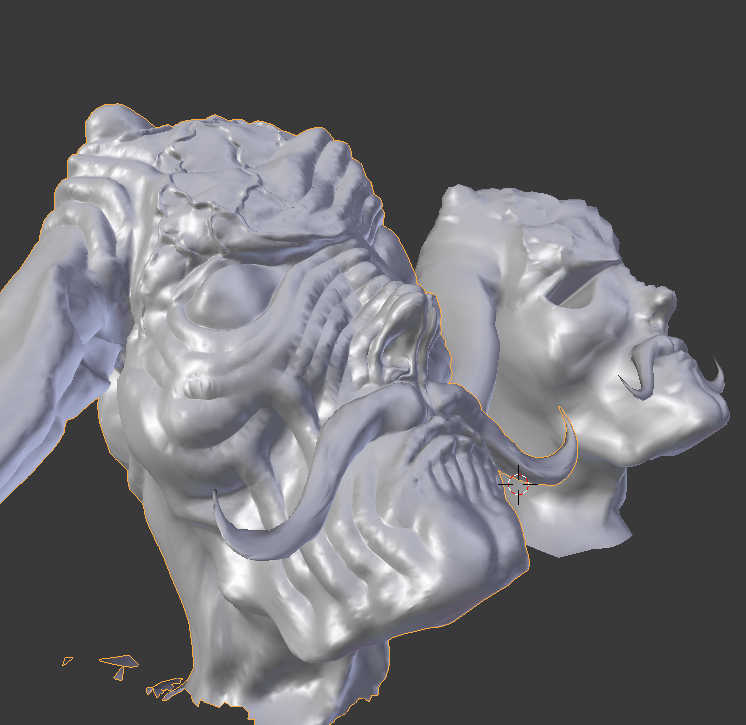
Dyntopo, although it is a portmanteau for Dynamic Topology, is that and much more. Unlike typical, non-destructive sculpting which only affects the shape of the model, a Dyntpo mesh is able to both have its shape as well as its topology influenced by certain sculpt brushes. Although the idea of shape or deformation refactoring topology might seem contradictory given that topology is typically preserved under deformation, you should also bear in mind that the topology is effectively ‘dynamic’ and therein resides its namesake. In other words, the old topology is erased and rebuilt, ideally in realtime, with each brushstroke. It is this refactoring of topology that the destructive nature of this sculpting technology resides as well as its greatest asset, that being the ability to increase a model’s resolution only where it is necessary.
Also worth noting is that preservation of topology is typically not an objective artists pursue when working with Dyntopo, in fact, the opposite is true. As previously noted working with Dyntopo relieves artists of the technical requirements associated with modelling.
In order to create meshes that deform predictably for animation or other such circumstances from a mesh that was created using Dyntopo, the mesh should first be retopologized.
Retrospectively working with Dyntopo and BMesh
Fortunately, if you are using a version of Blender greater than 2.62 then BMesh is not something you really need to be too concerned about. As BMesh was intended to replace the old mesh system, Blender versions greater than and including 2.63 will use it by default, this means that geometry can consist of triangles, quadrangles, ngons or combinations of any type. All you need to do is simply use Blender’s extensive set of polygon modelling and sculpting tools to create whichever type of polygon you desire and let Blender figure out the rest. The only time you need to be aware of which mesh system you are using is if you wish to import a model created with the new BMesh system into a version of Blender older then 2.63, for whatever that reason may be. In that case, your model might need to be quadrangulated or triangulated then either saved to a legacy format or exported to a format such as OBJ. Of course, this will disregard all animation, rigging and various other Blender specifics.
Dyntopo on the other hand can be turned on and off when working with Blender’s sculpt tools. The results, as noted above, are that you will effectively be using a destructive or non-destructive sculpting technique, respectively.
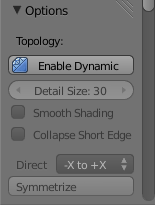
Enabling Dyntopo in older Blender versions required clicking the Enable Dyntopo button. This was available from sculpt mode, as a tool option for applicable brushes.
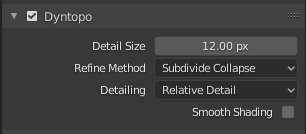
In more recent versions of Blender the button has been replaced with a checkbox. Accessing Dyntopo remains relative to the sculpt mode interface as well as a part of tool configurations. Over the years, improvements have been made to various aspects of the tool. Significantly, this includes the ability to gain a greater degree of control over how detailing in dynamically generated topology relates to camera proximity or even the size of the brush.
Retopologizing a Dyntopo Model
Not all models created with dynamic sculpting need to be retopologized. A few of the reasons you might consider retopologizing your model include if you want to create a workable UV layout that can be used for texture painting/mapping etc, if your model is intended for animation especially character-based animation, if you want to export your model to another 3D application or games engine working with a high poly count could significantly impair performance.
Retopologizing is a modelling technique that is used to create a mesh with more suitable, usually realtime, topology. This is in contrast to the topology of a sculpted mesh and is a technique used for various reasons including the aforementioned.
There are many free and commercial tools for assisting or automating the process of retopologizing. However, if you have a background in 3D modelling this will certainly be to your advantage. Sometimes the simplest options might provide the best solutions, bearing this in mind and in terms of retopologizing you could find all the solace you need in the snap to faces button. Once this button is enabled, it’s just a simple case of extruding vertices to create the desired edge loops. Then selecting edges and creating polygons. It’s always very tempting to create a fully quadrangulated mesh through retopologizing however this is not always necessary and in certain instances when the mesh is intended for a static shot using ngons in the model could speed up the modelling process and have no visible effect on the quality of the rendering.
Once a retopologized mesh is created, it’s a simple case of creating a normal map if desired and/or using multires and shrinkwrap modifiers to retain the sculpted details and maintain a manageable, deformable model. If you are feeling a bit lost at this point you can read more about it here.
The Future of Sculpting in Blender
Blender’s sculpting technologies are actively being developed while sculptors have been receiving a rapidly expanding toolset over the past decade that rivals any proprietary solutions. One could even say that things have come full circle in the sense that where the technology deviated from a non-destructive workflow emphasising the use of the multires modifier, we are now seeing new hybrid workflows that utilize aspects of both destructive and non-destructive techniques. But does that mean sculpting is becoming more of a technical than artistic skill? Not in the least bit, in fact the emphasis in the question might be misguided given that many technical artists embrace such cross-overs and create not just art but the tools with which to make it.
If you want to learn more about some of the new and exciting tools added to Blender’s sculpting toolkit, keep an eye on the Blender Developers Blog.
