It’s worth noting at this point, that the technique used for sculpting this model is not typical as sculpting is performed non-destructively. In other words, sculpting does not alter the model’s topology by means of Blender’s Dyntopo technology instead sculpting is performed by simply displacing existing vertices on the model.
This basically means sculpting on top of a Multiresolution Modifier.
Although this technique, has over the years, tended to fall out of favor over the almighty Dyntopo, it still has it’s benefits. I would not say that either technique is better or worse than the other they are just simply different approaches to solving similar problems. As such, one will be beneficial in some areas where another technique will be less so.
Dyntopo
One of the most alluring characteristics of Dyntopo is the natural approach it lends it’s self towards. When using Dyntopo you don’t need to be concerned with technical matters such as topology, the propagation of high level sculpt data to the base mesh and the implications of the inverse. You don’t need to concern yourself with the even distribution of subdivided polygons over your model and how topology can be used to influence the weighting of distribution, thereby salvaging valuable system resources and forcing detail only in areas where necessary. …Not at all, as Dyntopo will easily handle the matter of adding detail for you by subdividing polygons according to the abstraction of a “paintstroke”. Which is of course exactly what you should expect, as an artist, after all.
Nonetheless, with all of these pro’s there must be some cons. Well, I wouldn’t go so far as to call them con’s as much as caveats of which the most obvious is the lack of consideration for continuous edge loops, quads and all matters relating to generating decent topology for the purposes of an animatable character, in general.
Ultimately, what this translates to is that if you wish to utilize your character for animation purposes it would not be recommended that your model (you have just spent all this time sculpting) is itself, physically included in that pipeline. Typically, what you would do in this case is retopologize the model and bake a normal map from the sculpt data. Sounds easy enough? Well, that depends on your skill level and also if you have any fancy tools at your disposal.
Either way you look at it, topology does certainly play an important part in ensuring that characters intended for animation deform in a predictable manner. Whether you attain good topology through retopologizing (as previously discussed) or whether you take the non-destructive approach as outlined in the Minotaur character, is a matter of what suits your needs at the end of the day.
Non-destructive Sculpting
For the purposes of this character, I opted for the non-destructive approach just because I wanted the benefit of not having to complete the sculpting process before I was able to effectively apply the first useful texture map to the character. I also like working on more than one area of interest at a time, this way I can experiment with sculpting and texture mapping simultaneously and immediately see the effects of how each aspect of character development influences another. These effects can easily be visualized through a software render that would give me an arguably, more accurate representation of the final output. That, to me, can also be quite a natural approach to character development, as a whole.
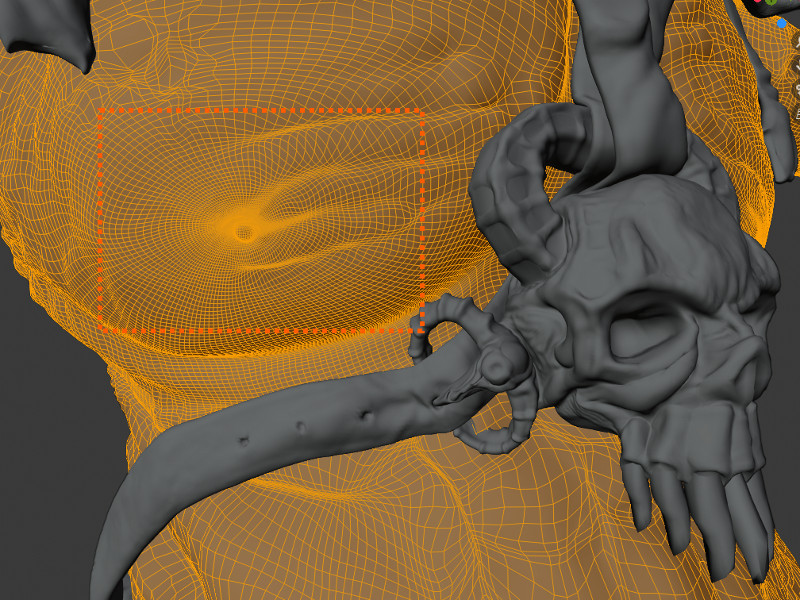
In the above image you can clearly see that this model has not been sculpted with Dyntopo, as even at the higher levels of sculpting the edge loops continue to follow the base model’s topology to a large degree. The high res sculpted data effectively forms part of the production pipeline, with this technique.
LOD
Another benefit of this technique is that if you plan on exporting your character for a games engine, you will already have various Levels Of Detail (LOD) models, each with the same UV layout and vertex ordering. An LOD variant can then simply be created by collapsing the model at a predetermined multiresolution level. For example, in this model I would effectively be able to create 5 LOD’s with a few simple clicks and retain complete control over each model’s topology, without having to rely on a plugin that automates retopologizing, to save time. That can be quite a big plus in terms of game engines, particularly for next gen engines that can crunch through millions of polys per second and utilize what would typically have been film quality assets.
As the vertex ordering is exactly the same on all of the LOD’s you will also be able to use the same rig, weight maps and subsequently animations on all of them, but we’ll get into all of that a little later.
For now, I’m happy with the main sculpt and so I can move onto the next step. Of course, it’s worth also noting that as the sculpting process is non-destructive I don’t have to decide that I’m done with sculpting at this point in time. In fact, I could revisit sculpting at any stage in the future including after the character has had UV’s laid out, been texture mapped, rigged and animated.
As a result, you can see there are still alot of benefits to using this sculpting technique. Although, I am perhaps over-simplifying some of the complexities of this setup you will nonetheless come to see that it is certainly achievable and definitely effective in production as we discuss the setup in more detail in posts to follow.