Skinning is the process of attaching geometry to an underlying skeleton or armature. We then use the armature to pose the model and simplify the process of animating it. There were several issues that had to be considered when skinning the Minotaur character, of which the main issue was inconsistent Normals.
This post will cover a method I discovered on how to correct this issue without having to resort to a lattice/cage deformer and still allowing for the (very important) proxy object method of rigging.
What’s so bad about inconsistent Normals?
As all polygons will have two surfaces, the software you are using will need to know which of those two surfaces is pointing away from the mesh. Geometry’s Normals should be perpendicular to the surface of the polygon pointing away from the outer surface of the mesh. This is not only important for skinning but also for sculpting.
📝 If you are feeling a bit lost a this point, you can brush up your knowledge on Normals in my free 3D course
1. Easy Fix
The best way to ensure consistent Normals in a 3D package is to Apply or Bake all transforms of the model, then select the model’s faces, normals or vertices (depending on your 3D software) and recalculate the direction of the selected component’s Normals.
In Blender this is really easy as ctrl-n will automate this process for your selection. In other software you might need to turn on “show surface normals” to ensure that the objects Normals are pointing in the correct direction, and if not select the erroneous component and choose “flip normal”. This will reverse the direction of the selected component’s normal.
You might come across inconsistent Normals when sculpting with a tool that translates geometry away from the surface or into the surface of the mesh. For example, creating a stroke along the surface of your mesh (with a sculpt tool such as “Draw”) could start as concave but end as being convex. In this case the Normals are possibly inconsistent and need to be addressed.
If this problem is not addressed and the same model is used in skinning, that model is likely to suffer from poor deformations.
Problems Arising From The Modifier Stack
Although this problem might be trivial at times and fixing it is simply a matter of performing the steps outlined above (see Easy Fix), sometimes the above method will not be practical as it does not respect an objects modifier stack. If you are using one or more modifiers in your objects stack such as multi-resolution or other modifier that deforms the object at a component level, reversing the Normals of the base mesh will effect everything in the stack above it.
Secondly, if you are using a multi-resolution mesh you will probably know that working with a mesh at it’s highest level of subdivision is simply not practical. The problem is that in order to recalculate the object’s Normals you need to bake the modifiers into the object’s stack before you can recalculate the Normals, and recalculating the Normals of a high resolution mesh baked from a multi-resolution modifier is not practical and sometimes not even possible (for lack of system resources).
2. Normal and Displacement Maps Method
If you have come across this problem, one of the most common solutions seems to be to bake out a normal and displacement map from the sculpt data although, I found that this method produces results that are in some ways vastly different from renderings that include the highest level of sculpt data.
However, as you can see in the image below, the results are not completely unusable, but warranted too much of a compromise on quality to be used as a sole solution.

The above image demonstrates the results of this method. It is a single subdivision from the sculpt data baked into the mesh, this means that the mesh being used for the final render is a realtime mesh. Since the multires has been applied/baked into the mesh the normals can be recalculated safely. The model then has a Normal map and a Displacement map (which were both previously baked from the highest level of sculpt data) applied to it. A subdivision surface modifier is then applied to the model and it’s levels are increased for render time (the viewport model remains realtime).
Cons
As you can see the results are not too bad, but substantial detail is lost in the lower body and the outline of the model is exceptionally smooth in an undesirable way.
Pro’s
The main benefit of this method is that it computes optimally for realtime viewport interactivity and has a relatively short render time. If your character is not a focal point and nothing closer than a wide shot is required you’ll probably be able to achieve useful results from this method.
3. Weight Transfer and Mesh Deform Method
One of the methods I am familiar with in dealing with this problem is to create two models a realtime model and another high resolution model from the sculpt data. The realtime model is then skinned and animated, the high resolution model is then bound to an identical or the same rig before render time and the weights of the realtime model are transferred to the high res model. As a result the only process intensive task performed on the high resolution model is rendering. No manual production tasks need be performed on the high resolution model, which would be impractical. This tool set has existed in Maya since version 6.5 (if I’m not mistaken).
I was expecting to use this method in Blender, however it slowly became undeniably apparent that Blender does not (as of version 2.63) have a transfer weights option that matches the usability that I’d previously been accustomed to.
The issue is being addressed by user 2d23d and you can read about it at this post on blenderartists.org
The addon looks very promising and I sincerely hope it continues to be developed, as at present it is unable to address exceptionally high levels of geometry. Which made it unusable as a solution in this particular situation.
Other methods are suggested in the above thread such as the usage of a “mesh deform” modifier, which I think was added to Blender during the Apricot project which resulted in the open source game Yo Frankie!
Unfortunately, the mesh deform modifier proved to be the most cumbersome and difficult method (particularly as weight transfer only takes a couple of minutes in Maya). Creating the deformation cage took a total of 10 hours, and the results were unfortunately still unusable. I would recommend that anybody attempting to use this method creates a cage from scratch and do not try and convert a base mesh into a cage, especially if your model is not symmetrical or has a lot of sharp edges.
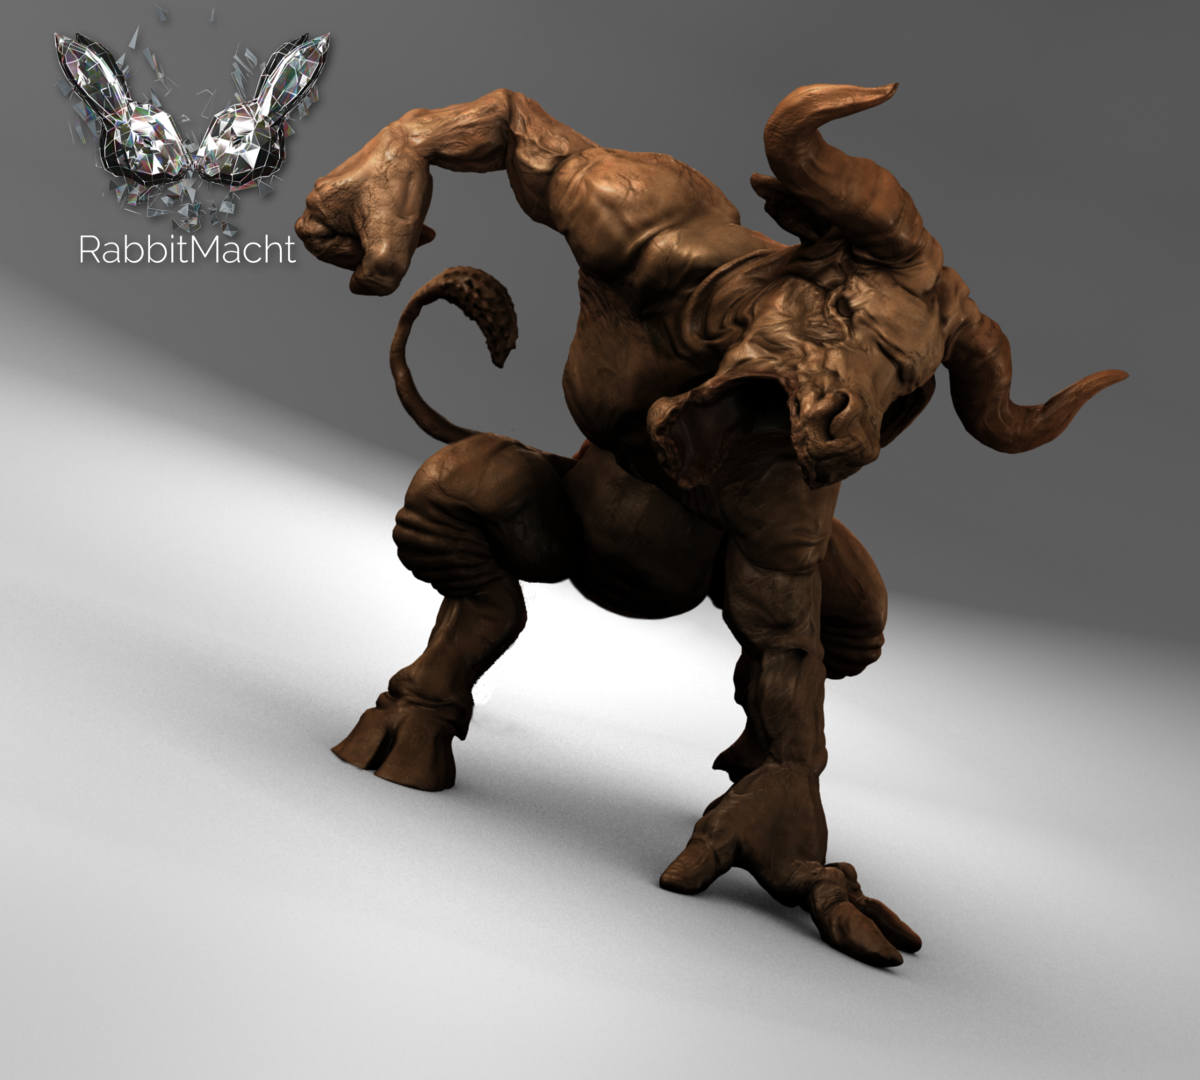
If I had been able to apply the mesh transfer method I would have ended with a result similar to the one below.

The above image is a rendering of the actual sculpted model at it’s highest level of resolution. As you can imagine this is a mammoth sized polygonal model, for example the cracks in the skin are geometry and not a normal map. Looking at this rendering and the final render below it’s difficult to tell them apart, however the most notable difference is in the characters tail which you can see faintly behind the character’s left calf. The highest level sculpt render (above) shows protrusions extending from the end of the tail, the same protrusions created from the realtime model (below) do not extend as far. This can, however, be corrected by using a level 05 sculpt for the shrinkwrap target (method explained below) and increasing the subdivision surface levels at render time. But in this case it would not warrant the
additional time that would be added onto the render as the end of the tail will mainly be covered in fur.
4. ShrinkWrap Method
The method that I finally settled on turned out to be exceptionally simple and takes only a few minutes to setup.
- Bake a Normal Map from the highest level of sculpt data (and a Displacement Map if desired).
- Create a Realtime model and a High Resolution Model to be used as a reference at render time.
The High res model does not need to be baked at the highest level of sculpt data. I chose level 3 of 5 because at level 3 all indentations in the mesh are visible therefore breaking up the smooth outline problem mentioned in earlier render tests (see Normal and Displacement Maps Method). - After ensuring that the model’s normals are facing the correct direction, for both models (see Easy Fix). Place the models on different layers and hide the high res model so as to speed up viewport interactivity and apply the Normal and Displacement maps to the realtime model as per usual.
- Select the realtime model and apply a Subdivision Surface Modifier (so as to increase the poly count at render time as this will be the final model used for rendering), then add a Shrinkwrap modifier and target it to the high res model. Order is important here, as the surface needs to be subdivided at render time before it can be shrinkwrapped to the high res model.
- Bind/Parent the realtime model to an armature, with the armature modifier completing the stack in the setup. Once again, order must be respected this is so that the armature deforms a representation of the high res model (by means of the other two modifiers) at render time.
As you can see using this method the high res model remains hidden and out of the way as it requires no manual process intensive work such as weight painting, binding (to cages or armatures) and no proxy mesh data transfer is required either. The longest part of this setup is baking the Normal and Displacement maps.
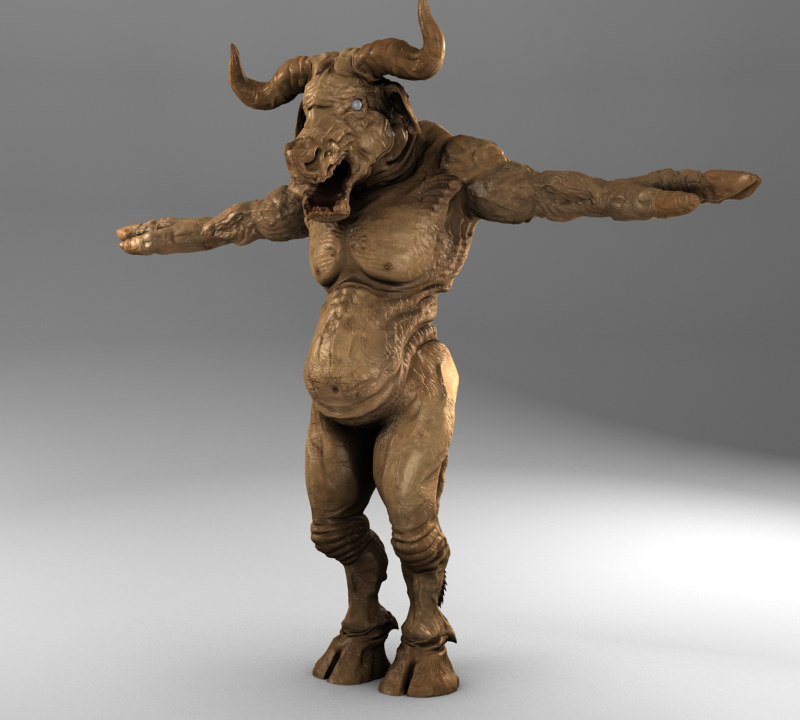
The above image is the final result, as you can see the highest level of sculpt detail is retained, for example the bumpy and folded knee area in this render can be compared with the initial rendering for the Normal and Displacement Maps Method where the knees are extremely smooth. Also note that the models outline is no longer smooth, either.
Another benefit of using this method as opposed to rendering high resolution geometry from a viewport (such as in the weight transfer method), is reduced render times. This model takes approximately 5 minutes to render compared to the image shown in the “Weight Transfer and Cage Deform Method” section that takes approximately 30 minutes to render (as my system has to resort to swap space in an effort to cache 8GB (RAM) + 3.6GB (Swap Space) of polygonal data).
PS. You might have noticed that the Minotaur suddenly has some color but I’ve not mentioned anything about it until now. That’s because I’ve started texturing him, but as you can see this is not yet completed.
So you can expect a post on materials, textures and rigging soon!