An Introduction To 3D with Lyndon Daniels
Table of Contents
An Introduction To 3D with Lyndon Daniels
Part 6: Texturing and Shading
Organic Texturing
iA bump map creates ridges in a surface and makes it appear uneven, bumpy and more organic. This is useful as it allows us to approximate detail without having to model it.
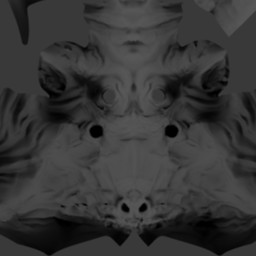
Bump maps are visible through hardware rendering but are most accurately represented through software rendering. Bump maps are generally represented by greyscale images which, by default, will translate the dark areas of the image into a recessed or concave appearance on the 3D model during rendering. The light areas of the map will translate to convex looking areas when rendered. This can be useful for simulating details such as pores in skin or wrinkles.
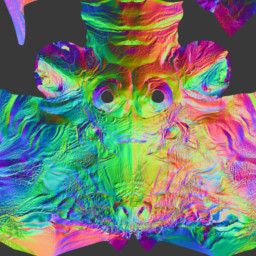
Normal maps perform a simmilar purpose to bump maps but agruably with more accuracy. Normal maps are also used to simulate concave and convex detail on a 3D model generally where it does not exist, however Normal maps do so using the full color spectrum. This provides for a greater degree of accuracy when it is needed. Have a look at the images below on the left is a typical Bump Map and on the right is a typical Normal Map of the face face of a minator type character. Notice how the details of the folds of the skin are more visible in the latter image.
Displacement Maps perform a simmilar purpose, however differentiate substantially in how they are applied to a model as they will generally require application to a high resolution model in order to see thier effects. This is because Displacement maps are used to physically move (displace) geometry to form indents (concave) and outdents (convex) in a model.